Speaking of the deadline... After I found out that six of the fifteen pieces for which I submitted photos had been accepted, I thought for weeks that I needed to deliver the pieces on June 20th. Turns out that it was June 17th by 5 p.m., which I discovered at 10 p.m. on June 17th!
However, I still needed display stands on the 17th even if I had realized that was the due date for delivering the pieces. I had three display stand "plans": A, B and C. Plan A - they were to be built by a friend Phil works with, Josh, who also happens to be the son of the family who built our house. Plan B - our friend who owns a bike shop in Cheyenne was going to build some stands for me in case Plan A didn't work out. Plan C - I ordered (in plenty of time) a number of generic stands from my usual source in Texas, but I had two pieces that would NOT work in any commercial display stand.
On the 17th... Plan B fell through: Our friend's welder broke and he had to order parts in order to finish the stands. Plan C: I hadn't received the stands from Texas... I called the company and they said they were shipped the 16th! Turns out that I found out later, part shipped on the 13th... back-ordered stands were shipped on the 16th. Phil found them on Saturday by the downstairs entrance to my studio in the garage.
Plan A... I didn't hear from Josh for days when I was really beginning to sweat because I didn't know WHAT I would do if I didn't find something to use for my odd-shaped pieces. He lost his phone at work and didn't find it until Saturday, I think it was. I managed to keep busy putting together a new inventory of smaller items to sell at the gallery gift shop, but finally we heard from Josh! He brought the stands to the studio to make sure everything fit, but had to take all but one back with him for adjustments.
Once we got the glass piece into the one stand Josh left with us, we decided we'd better not try taking it out again. It was a little tricky to insert... but looks pretty cool. This is it:
 |
| Potential Energy |
It wasn't until Monday after I got home from work that I was able to check my email to see whether I could still enter my pieces on Monday. They said I could! Josh brought the stands to me that day around 1:30... after hitting a car on the way over. There were still a few weld marks that needed to be buffed out... Fortunately, we made a contact with a man near us who helped us with that and, at about 4:30 p.m. I was able to get the pieces to the gallery! That is about 1/2 hour sooner than typical for me, sad to say.
So, we wheeled our crates of stuff into the gallery. I will be the only glass artist exhibiting in the show... and I got to include six pieces, which is more than other people got to submit because most of their pieces have to hang on the walls and wall space is more limited than floor space. :-)
Here are the other pieces I submitted - fast photos taken in my table top studio, but I hope to get better photos of everything all displayed at the show - or maybe they'll let me get photo copies that are being taken for the show catalog.
 | |
| Morning Reverie |
 |
| '57 T-Bird: White with Pink Interior |
 |
| Blonde Bombshells |
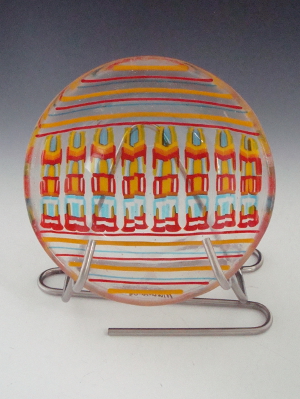
 |
| Ikebana Sunrise |
 |
| Coliseum |
So, that's six. Come out to the show and buy one! I need to pay for a lot of display stands! :-)
c@
No comments:
Post a Comment